How to create a photo collage?

          Collage is a way to assemble many photos into a single photo. This is a better way to remember memories within a single photo. However, There are many applications to create collage’s. I think Picasa, One of the Google product’s, is the best application out of all to create collage’s.
Here is the step-by-step procedure of creating collage.
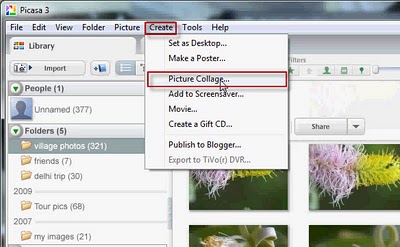
          1. Open Picasa and select “Picture collage” from “create” tab.

          2. After selecting, You can see the window opened as shown in the below screenshot.

          3. In this window, select “clips” tab. There you can see all the images. Now, Just drag and drop the images (which you are going to create collage with) into the right pane.

          4. After draging the images into the panel, Just edit them as you want and save the collage.
          5. Now, you can see the collage saved in the specified folder.
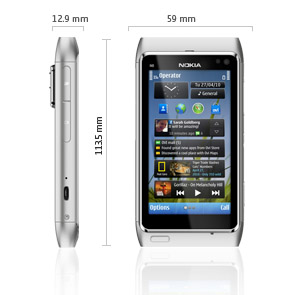
Amazing and Slim Nokia N8!!!

          The new Nokia N8 is available in the Indian market’s from october 2010 as mentioned in many sites. The phone is going to be the first release from Nokia with a 12MP camera. I think there is no need of talking about the clarity of images captured by it. Since, It has a 12 Mega Pixelled camera, It allows to capture even a High Quality images as well as Video’s. The device is as thinner as 12.9mm. It allows to manage 3 desktop’s at a time. So That, You can access Gadget’s and Application’s directly from the desktop. There is an inbuilt Facebook application which allows to receive message’s, update’s and friend request’s on the home screen.

          The phone is available in 5 different color’s. While coming to the display, It’s a 3.5 inch touch screen. The price of the phone is to be expected to be 375 Euro’s. It has 16GB (expandable upto 32GB microsd) storage and 256MB of RAM. The processor is ARM 11 680 MHz and it has 3D Graphics HW accelerator. There are GPRS, EDGE, 3G, WLAN, Bluetooth and USB connectivities available in this phone. For more details you may visit nokia website.

An iPhone application to know How ugly you are??

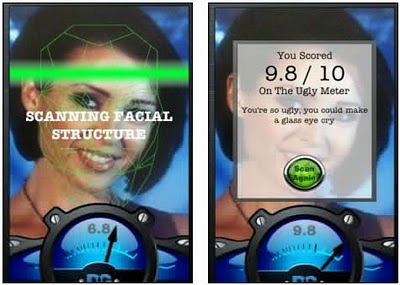
          “Ugly Meter”, By listening the name, you may know that it say’s how ugly you are? It’s a fun application which is available at App store for just $0.99. It allows you to take a photo and it analyzes the image and gives the result out of ten. Since this Meter gives score about uglyness, The higher the score, the more ugly is the person in the photo.

          Just have a look at the below Screenshots of the Ugly Meter.

          The Meter Displaying the result with a comment: “You’re so ugly, you could make a glass eye cry”.

          Download the application  from App store for just $0.99 and enjoy testing your uglyness..

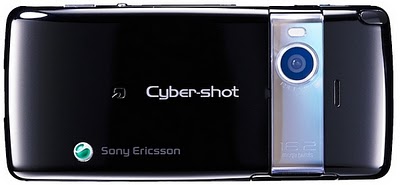
Sony Ericsson releases World’s first 16MP Camera Phone

          A 16.2 megapixel CMOS sensor is developed exactly before an year for cellphones. This Sensor has introduced by Sony Ericsson in S006 smartphone. This is a big jump from the current 12 MP cellphone cameras. This phone has Wi-Fi and Bluetooth connectivity, GPS navigation and inbuilt FM. The phone’s Processor is 1GHz Snapdragon and Sony Ericsson’s own OS.

          This mobile is being released in japan at the moment, So no idea on local availability and pricing yet.

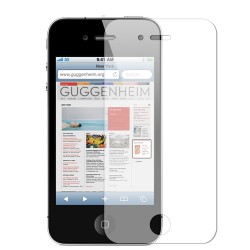
Buy iPhone case at iVogue and get a Screen Protector Free

          iVogue, One of the online shopping site’s, Now offer’s Screen protector on every purchase of iPhone case (It may be either iPhone 4 or 3G/3GS).

How to get Screen protector for free at iVogue.
          1. Visit iVogue.co.uk and Choose your iPhone case to buy.
          2. After Selecting, You will Directed to your Paypal account for the payment.
          3. There you can see “Add special instructions to merchant”link.
          4. Select “simonblog” as special instruction and pay for the case.
          5. Now, iVogue sends you a screen protector (worth’s 2.99 pounds) free with the case.

How to delete “Run History” in Windows?

          When you need to delete “Run History” for some reason’s, You may be thinking on How to do it. But now, Don’t worry about that. Here, I have explained clearly about Deleting “Run History” in this post.

          1. Open Run Either by selecting “Run” from Start menu or by using Ctrl+R shortcut.
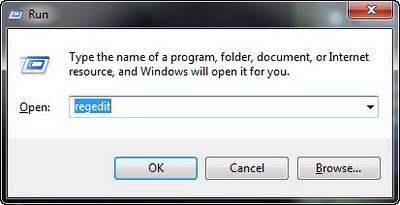
          2. Type “regedit” in the “open” field and press “Ok”.

          3. By clicking Ok, You can see Registry Editor opened. Now, Expand “HKEY_CURRENT_USER” folder by clicking on plus sign.
          4. In the sub folder’s Expand Software > Microsoft > Windows > CurrentVersion and open Run folder.
          5. Now, You can see Program’s listed on the right windowpane. Exactly, This is the “Run History”.
          6. Just Select the program’s which you want to delete from history and Select “Delete” by Right clicking on the selected program’s. The History will Disappear now.

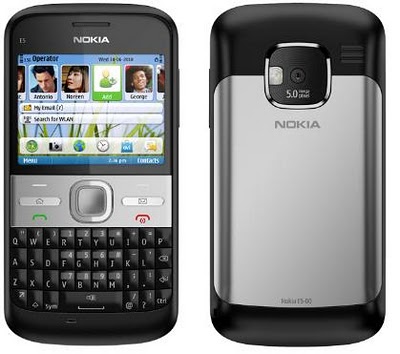
Nokia, Going to release E5 into the Indian market’s

          The new Nokia E5 is going to be released in the indian market. The mobile comes with Symbian OS and higher end specification’s. It has a QWERTY keypad which enhances comfortable typing. The battery is BL-4D 1200mAh Li-Ion and it is capable to provide talktime of around 7 hrs for GSM, 4 hrs for WCDMA and stanby time upto 600 hrs for GSM, 545 hrs for WCDMA. The phone is available in Carbon black, Chalk white, Copper brown, Silver grey and Sky blue colors. Currently, Avalable in Carbon black and Chalk white colors.

          The 5MP camera allows to capture high resolution pictures. There are HSDPA, HSUPA, GPRS and EDGE data connections. The device is also compatible with GPS, WLAN and Tri-band. The phone weight’s 126gms. All over, The price is estimated to be Rs. 13,000. Let’s, Wait for Nokia E5.

Add your blog to facebook

          Just RSS feed is not enough to make your blog post’s reach to every one. Now it’s possible to Add a blog to your facebook profile. There is no application to show your blog post’s on your Facebook profile. Even it’s possible to show post’s on Facebook. This is possible by creating an account in www.twitterfeed.com .
Step’s to add your blog to Facebook.
          1. Create an account in www.twitterfeed.com
          2. Before this, I forget to say that it”s possible to post on facebook only if you have rss feed for your blog.
          3. After creating the account in twitterfeed, Just give your feed detail’s.
          4. Now, Select “Publish to Facebook”.
          5. Don’t forget to allow access from that site.
          6. That’s it, Now your post’s will be published on your Facebook profile as Update’s.

Finally, The post’s on your Facebook appear’s like this:-

Fun with Mario Forever !..

          Almost Every one might have played Mario in their childhood day’s. Even I had fun playing mario in my TV Video Game. Just now i found an extended version of Mario. i.e:- Mario Forever. Actually The game is  amazing. Even we can choose the older version of mario game. Here is a Screen Shot for you.

          In the Mario Forever ! Except the mario all the other character’s were animated different from the old one. You can see the difference in the above Screen Shot. But, There are very less Stages compared to the old one. The game is available in many sites to download. Download and Enjoy playing the game..

ngpay – An Application which equal’s a big Mall on your mobile

          ngpay is a mobile application provided by JiGrahak Mobility Solutiions (p) Ltd. The application was launched in February 2008. This Service has become the fast growing mobile commerce in india. Using this application user’s can Shop, Book ticket’s, pay their bill’s, Recharge, Bank and more just from their Handsets. It was mentioned in their website that, It has over 5000,000 registered user’s. Just take a step ahead and try this application.

Adding Search Box into a blog in Blogger

          Search Box is an essential component in a blog or website. This enables the user’s to Search in the same page where they are, without leaving your website or blog. You can engage the Search engine even to search on the web or only some specified sites. First of all, you need the code of search box for adding it into your blog or it may be a site. You can get the code by just Googling. There are two method’s of adding the search box.

Method-1 :-
          This method is by adding a HTML/java script gadget, and copying the code of the search box into it.

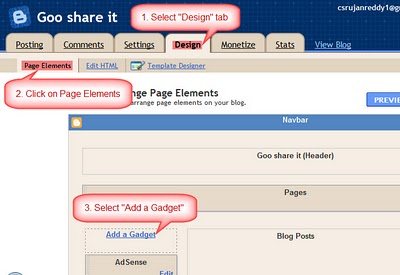
          1. login to your Blogger account and Select “Design” tab.
          2. Click on Page Elements.
          3. Select “Add a Gadget” on the page where you want to add search box.

          4. Now, You can see a Window with a list of Gadget’s, There you select “HTML/Java Script.

          5. Then copy the HTML code into the window which will be opened and save changes. Now you can see the Search box in your blog or website.
Method-2 :-
          As i told you, there is another method to add Search box. That is by editing the blog Template’s  HTML.
          1. First, Login to your Blogger account, and Select “Design” tab.
          2. Under that select “Edit HTML”.
          3. Then you can see the HTML code of your template.
          4. There find out the below lines of code.


          5. Then, Paste the search box code after those lines.
          6. That’s it, All you have done now.
          7. You can see the search box below the blogs name, as shown in below screenshot.
          8. If you want the search box above the blog’s name, Then, paste the search box’s code above those lines.

Turn your blog into a book.. Interesting!!

          Do you have a blog? Then why can’t you turn it into a book and publish it. Yes, It’s very easy to turn your blog into a book. This is possible with the help of website: blogspot.sharedbook.com . You can even earn some bugs by selling the book. To turn your blog into a book, You just need to visit www.blogspot.sharedbook.com and enter your blog’s address, Then click on “Print my blog”. You can even edit the cover page. You need to pay at last if you satisfy with the book, or you can cancel the process. Visit the website and enjoy creating book’s now…